Overview of the COMSOL API
When building multiphysics models or simulation apps, the COMSOL API lets you automate workflows, add customized functionality to simulation apps, and integrate with external tools. This article gives a quick overview of what the API can do, how you can access it, and where to find examples and learning resources.
The COMSOL API
The COMSOL API is the common foundation for every programmatic interface in COMSOL Multiphysics®. Whether you write methods in the Application Builder, drive simulations from MATLAB® with LiveLink™ for MATLAB®, or run models from Excel® through LiveLink™ for Excel®, you are always interacting with the same underlying classes and data structures that power the user interface (UI). For integration with an existing code base, you can develop Java code in an integrated development environment (IDE) such as Eclipse and then call the API via compiled Java class files.
Regardless of how you access it, the COMSOL API gives you full control over geometry creation, meshing, solving, visualization, and results evaluation. Any modeling task you can perform in the COMSOL® UI can also be done through the API. Moreover, the API remains consistent across all physics interfaces, whether you are working with electromagnetics, structural mechanics, acoustics, fluid flow, heat transfer, chemical engineering, or any multiphysics combination thereof.
You can use the COMSOL API to:
- Automate repetitive modeling tasks
- Import CAD files and material data programmatically
- Manipulate mesh and geometry data
- Work with randomized data
- Run simulations in a headless (no-UI) environment as part of a larger workflow or web application
To review some examples of how these tasks can be performed using the API via the Application Builder, see the following blog posts:
- How to Use Model Methods to Accelerate Your COMSOL® Workflow
- How to Create a Randomized Geometry Using Model Methods
- Generate Models from Text Files with the Application Builder
- Using the Chatbot Window in COMSOL Multiphysics®
- Modeling with ChatGPT®
Using the COMSOL API through the Application Builder
The most immediate way to get started is to use the COMSOL API for use with Java through the Application Builder. This approach requires no additional installation — just a standard Windows® installation of COMSOL Multiphysics®. The COMSOL API for use with Java employs the Method Editor, a lightweight development environment built into the Application Builder that features automatic compilation.
You can create a method by navigating to the Application Builder workspace, right-clicking the Methods node in the tree, and selecting New Method.
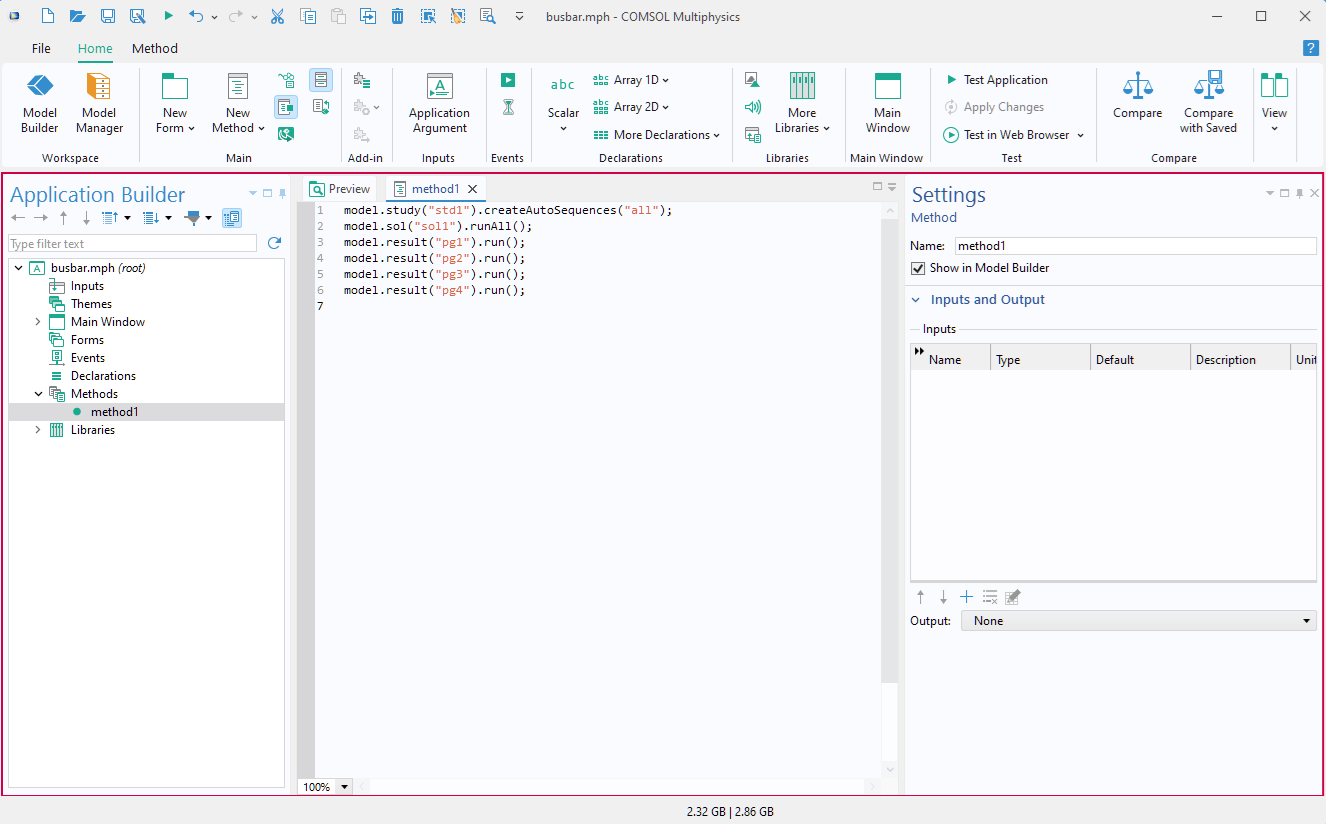
As an example, we entered the method shown in the screenshot below, which is the minimal code required to set up a full 3D heat transfer simulation in a cylindrical steel rod. The rod has a fixed temperature applied at one end and a spatially random heat source distributed throughout. We named this method runHeatTransferSimulation. A corresponding MPH file that includes this method is available for download here: heat_transfer_in_cylindrical_rod.mph.
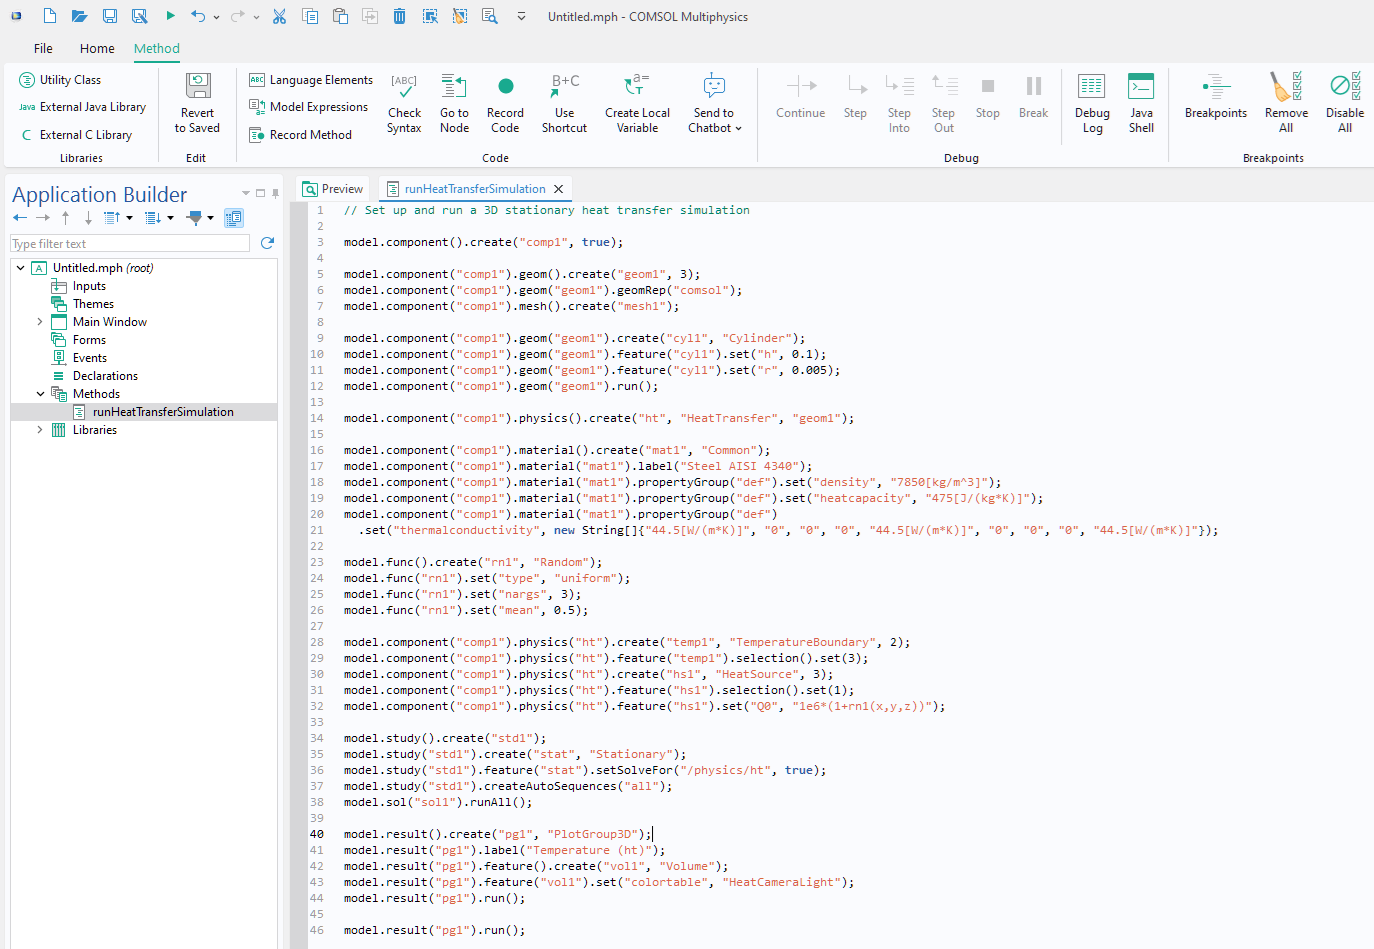 The Application Builder showing the code for a method that sets up a model.
Setup of a 3D heat transfer simulation of a cylindrical rod using the COMSOL API.
The Application Builder showing the code for a method that sets up a model.
Setup of a 3D heat transfer simulation of a cylindrical rod using the COMSOL API.
To run this code, we simply right-clicked the runHeatTransferSimulation node in the tree and selected Run.
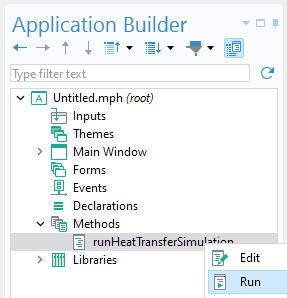
Running the heat transfer simulation method containing the COMSOL API code.
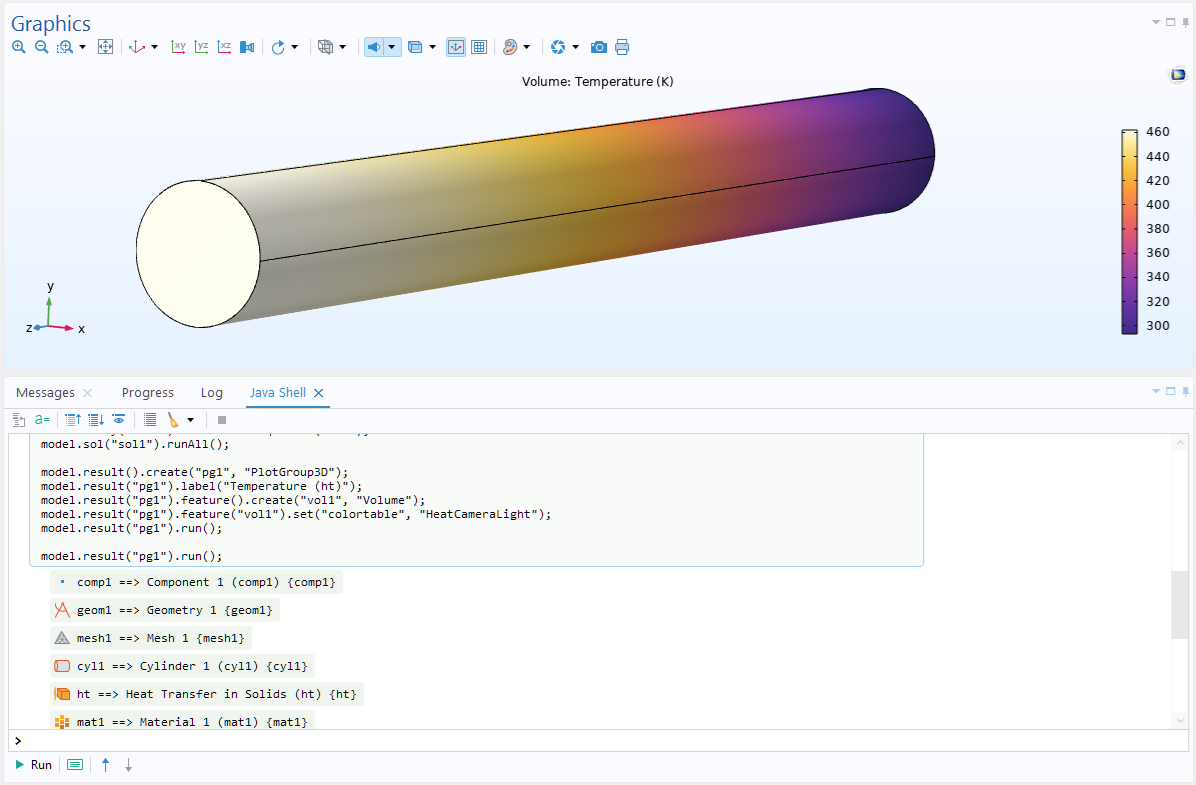
The screenshot below shows the results of this simulation as a plot of the temperature on the surface of the rod.
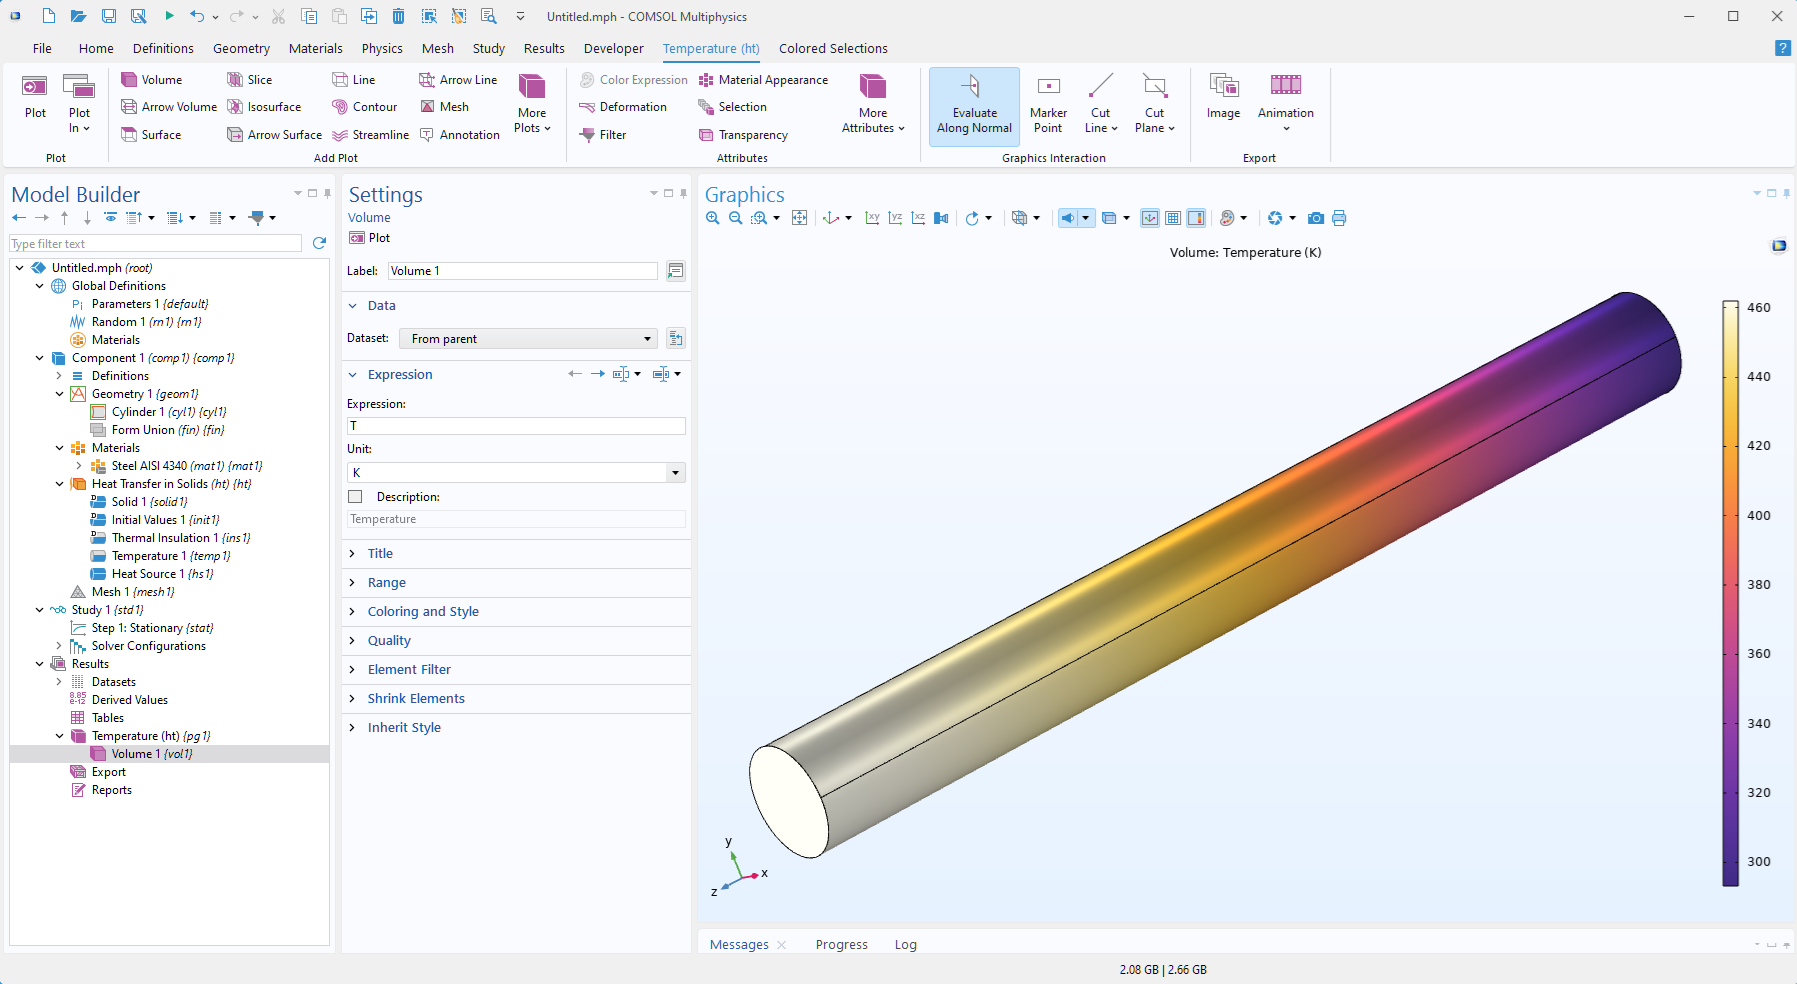 The Graphics window showing a volume plot of a cylinder with a color gradient indicating the temperature.
The simulated temperature field in the steel rod.
The Graphics window showing a volume plot of a cylinder with a color gradient indicating the temperature.
The simulated temperature field in the steel rod.
You can also use the Application Builder to build an app and to call all or parts of a method when the user takes a specific action in the app UI. See the Getting Started with Building Simulation Apps course for more information.
The following screenshot shows one of several methods from an app that computes the length of a tuning fork for a specified frequency. This example app is available through the software via File > Application Libraries and online in the Application Gallery.
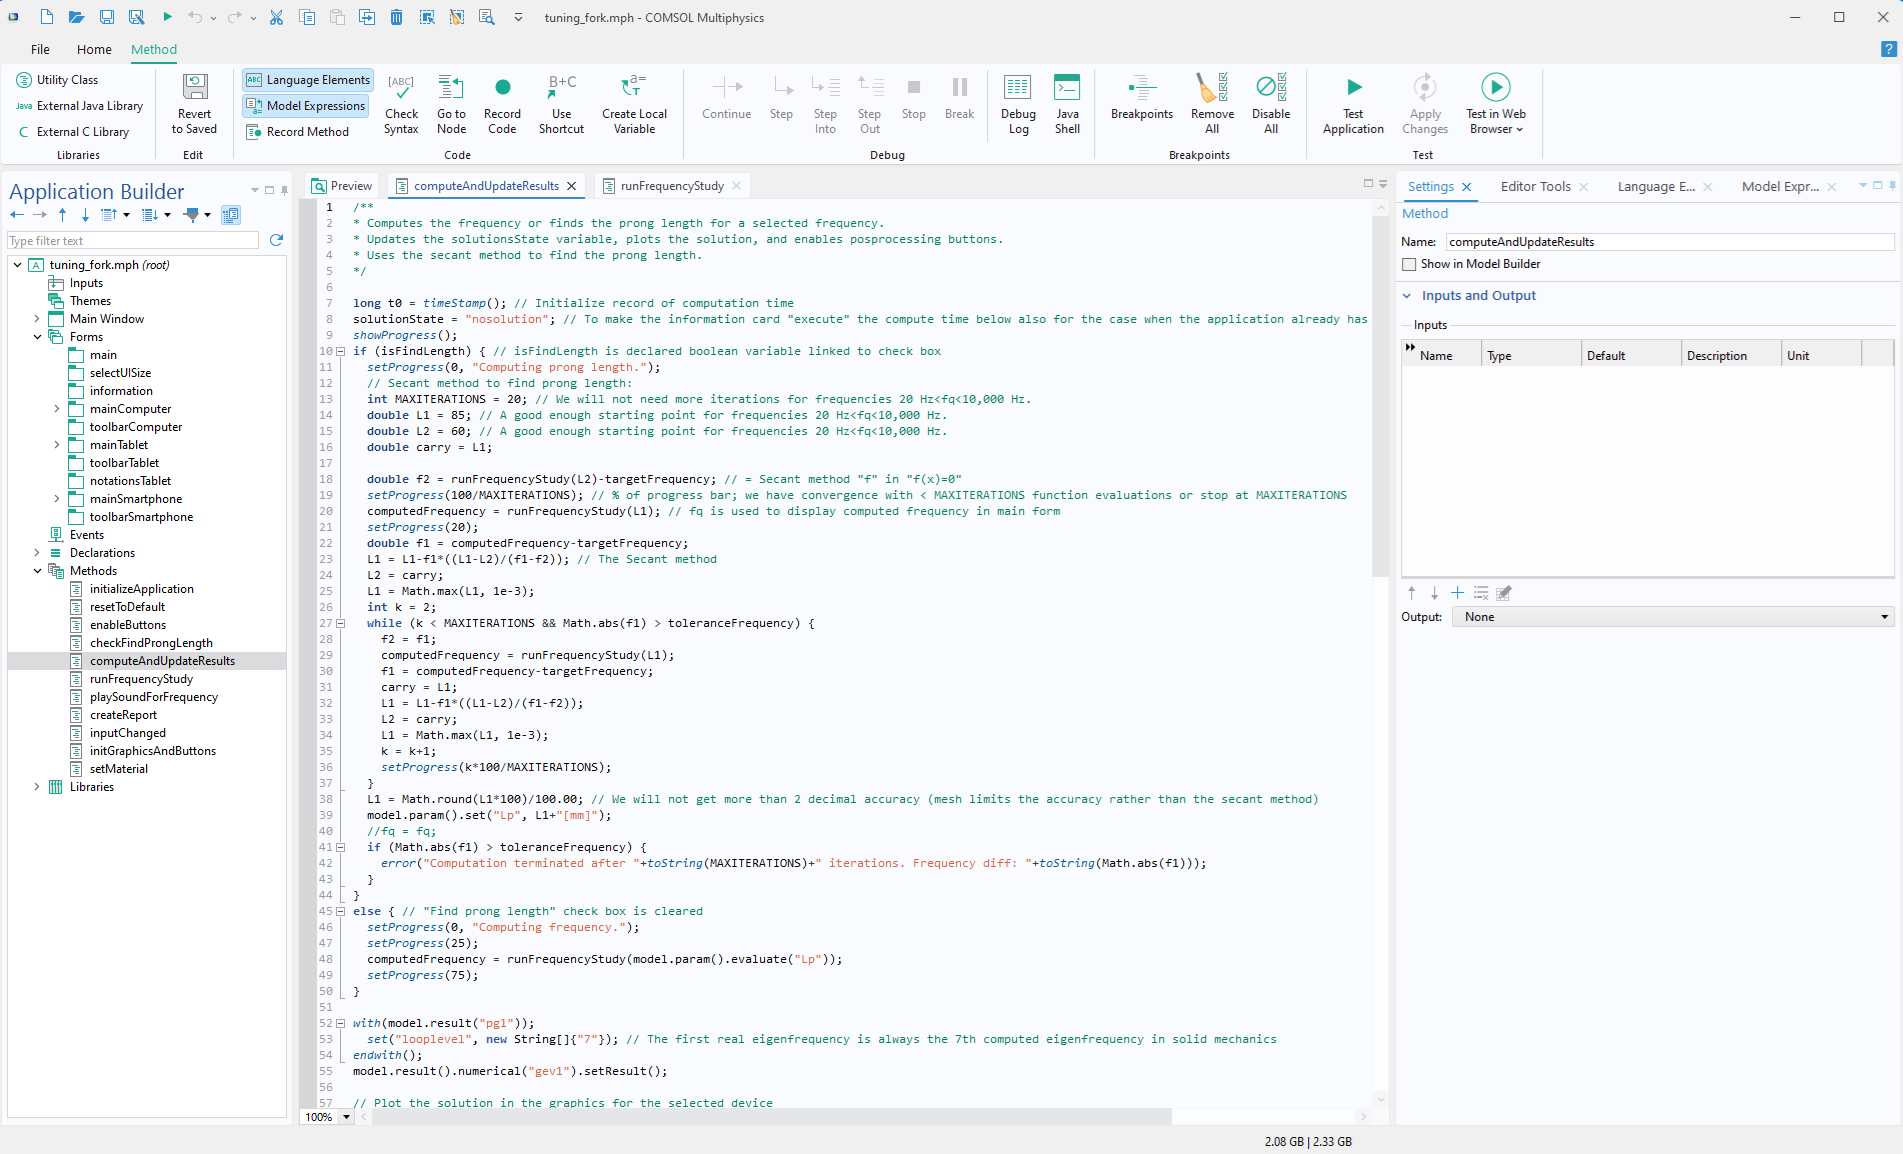 A method with API code is shown in the Application Builder.
API code in a method that is part of a tuning fork simulation app.
A method with API code is shown in the Application Builder.
API code in a method that is part of a tuning fork simulation app.
Recording and Running Code in the Method Editor
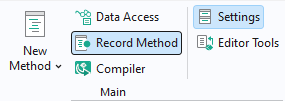
How do you learn to write API code like that used in the previous examples? You can of course consult the Application Programming Guide. However, the quickest way to generate code — without needing to gain extensive coding expertise — is to use the Record Method button available on the Home tab, which generates a new method by recording the model setup operations you perform in the Model Builder.
The button for recording API code in a method.
To append recorded code to an existing method, you can click the Record Code button on the Method tab.
While using the Record Method and Record Code tools, the COMSOL Desktop® windows are surrounded by a red frame.
 A red frame surrounds the workspace while one of the recording operations is enabled.
The COMSOL Desktop® windows are surrounded by a red frame during recording.
A red frame surrounds the workspace while one of the recording operations is enabled.
The COMSOL Desktop® windows are surrounded by a red frame during recording.
The heated rod model we used earlier can be constructed using this technique. To do so:
Start a new session of COMSOL Multiphysics® and click the Blank Model button in the New window.
Click the Record Method button and navigate to the Model Builder workspace.
Set up the model using the Model Builder functionality.
Switch back to the Application Builder and click Stop Recording on the Home tab.
In the resulting code that appears in the Method Editor, clean up any mistakes you may have made during the model setup.
Copy the finalized code.
To run the code:
Start a concurrent session of COMSOL Multiphysics® and click the Blank Model button in the New window.
In the Application Builder workspace, add a method and paste the copied code into the Method Editor.
Right-click the method node and select Run.
Note: As an alternative to running the code in a new session, you can add the call clearModel(model) at the beginning of your code before running it in the same session. Note, however, that this will delete everything in the model.
Running Code in the Java Shell Window
Introduced in version 6.3, the Java Shell window is an interactive environment that provides a command prompt for running Java code, supporting many of the features of the Method Editor, such as code completion, syntax highlighting, and more. To open the Java Shell window, go to the Home ribbon tab in the Model Builder. In the Layout group, open the Windows menu and select the Java Shell option.
Using the Java Shell window to run code provides a flexible alternative to generating methods, which requires switching back and forth between the Model Builder and Application Builder. Furthermore, when running code from the Java Shell window, you get access to the individual parts, or objects, of the model that were created or modified by the code. In the Java Shell window, you can click the label any of these objects to go to the corresponding node in the tree.
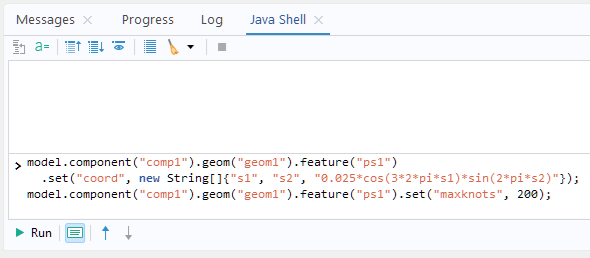
To run code from the Java Shell window, simply paste it in and click Run.
The screenshot below illustrates running code (for the steel rod model) in the Java Shell window.
 A cylinder with a color gradient is shown in the Graphics window above code run in the Java Shell window.
Running the heat transfer simulation from the Java Shell window.
A cylinder with a color gradient is shown in the Graphics window above code run in the Java Shell window.
Running the heat transfer simulation from the Java Shell window.
Copy as Code to Clipboard
In the Model Builder, you can right-click nodes in the model tree and choose options from the Copy as Code to Clipboard submenu to automatically create code that you can paste into your methods. The figure below shows selecting the Set All option for a Parametric Surface geometry object.
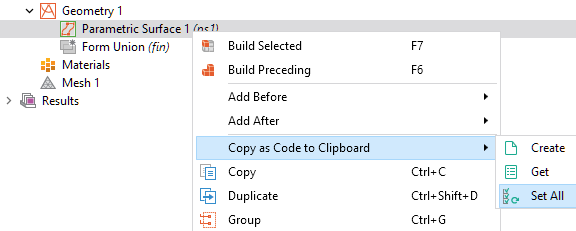
The Copy as Code to Clipboard functionality is available from the Model Builder tree nodes.
The figure below shows the corresponding code copied from the clipboard to the Java Shell window. This functionality serves as a lightweight alternative to the Record Code and Record Method tools.
The code generated from the Copy as Code to Clipboard functionality pasted into the Java Shell window.
Creating and Using Add-Ins
To customize your workflow in the Model Builder, you can create a method call or a settings form in the Application Builder and display it directly in the Model Builder. Because a method call or settings form is stored within a single MPH file, reusing it across sessions or sharing it with colleagues can be cumbersome. The remedy is to package the functionality as an add-in based on a method call, a settings form, or a custom ribbon tab. You can store such add-ins in a user-defined add-in library. COMSOL Multiphysics® also ships with several built-in libraries; by examining the forms and methods in these built-in add-ins, you can quickly learn how to construct your own.
Building an add-in is much like creating an application, with a few distinctions: An add-in does not open its own Graphics window; instead, it uses the main Graphics window in the Model Builder. Furthermore, it should run on any model, but when it cannot, it should issue clear, controlled error messages.
The figure below shows a model created with the built-in Image to Curve add-in, illustrating the kinds of tools you can develop. This blog post gives an introduction to using add-ins.
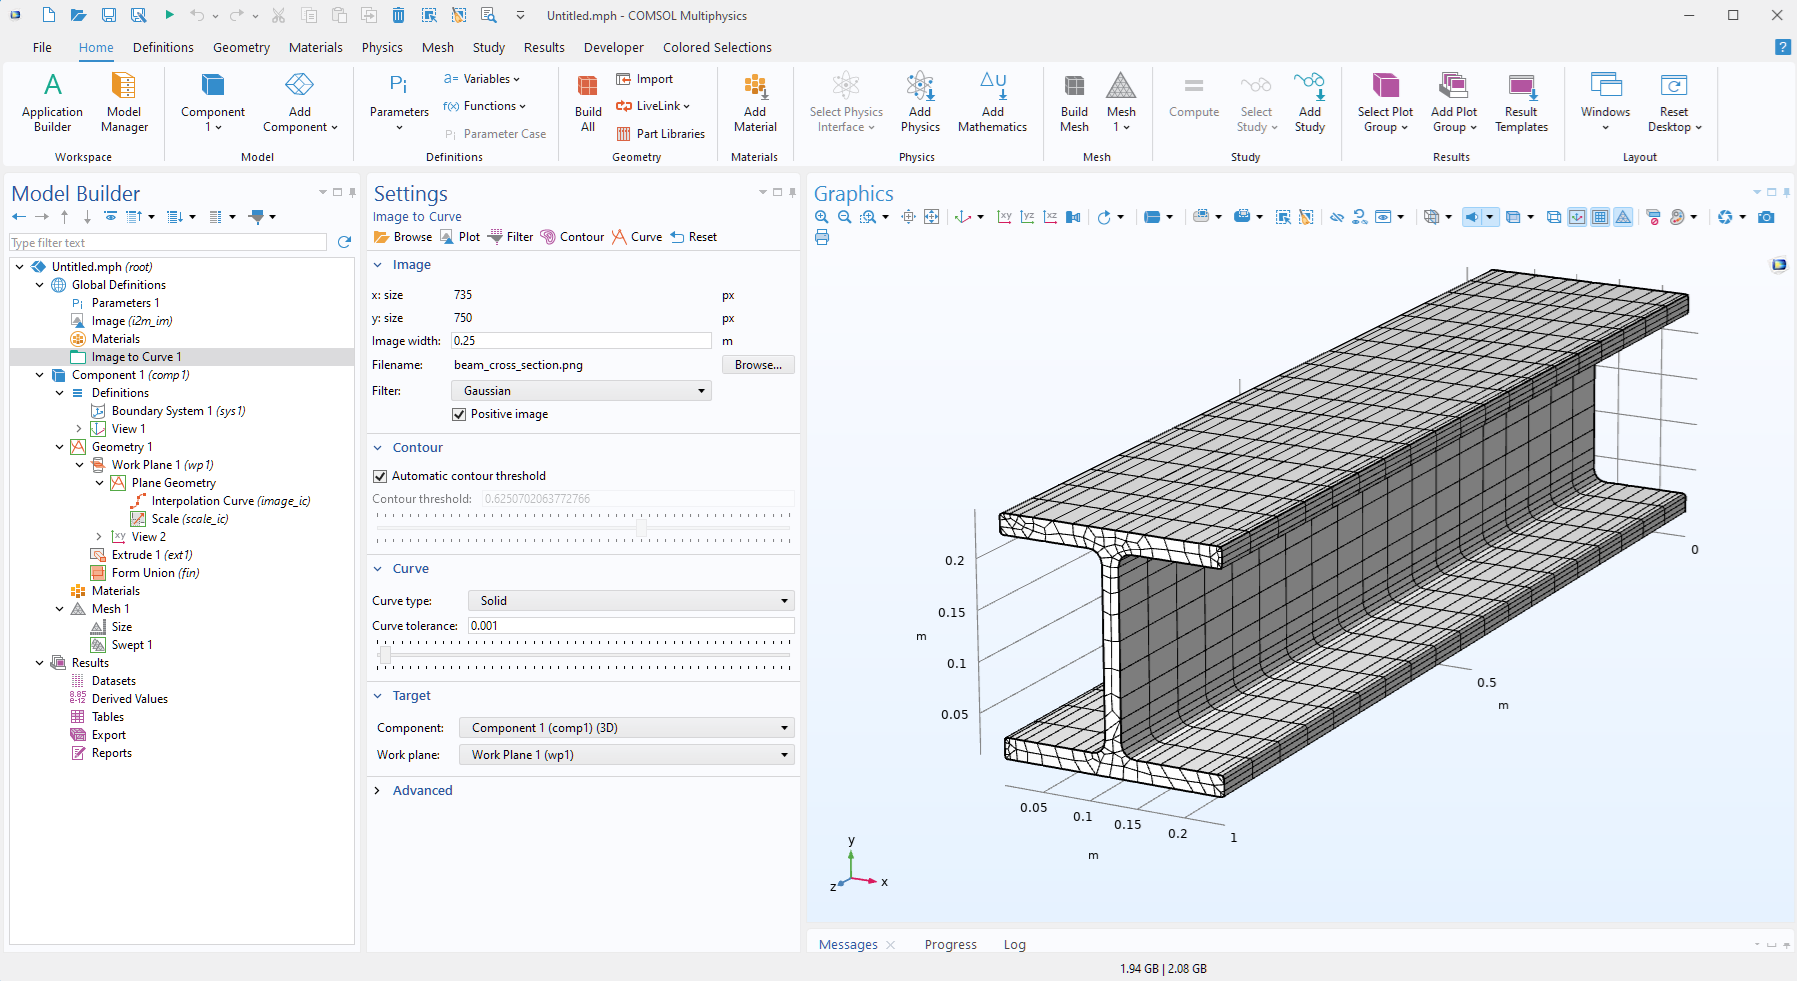 A gray meshed I-Beam is shown in the Graphics window.
An I-beam generated by extruding a profile curve that was created using the Image to Curve add-in.
A gray meshed I-Beam is shown in the Graphics window.
An I-beam generated by extruding a profile curve that was created using the Image to Curve add-in.
Further Learning: Method Editor, Java Shell Window, and Add-Ins
For more details on using the Java Shell window, the Method Editor, and add-ins, see the Introduction to the Application Builder and the Application Programming Guide. Note that the Method Editor and the Java Shell window are only available in the Windows® operating system.
Saving a Model as a Java File
If you set up a model using the Model Builder but forget to use the Record Code or Record Method tools and still want to learn about the corresponding API commands, you can save the model as a Java file. From the File menu, select Save As.

The Model File for Java save option is available from the File menu.
Then, in the file browser, choose the option Model File for Java (.java). This will save the file as a Java file that can be compiled separately.

The Model File for Java save option as it appears in a file browser.
The screenshot below shows how this file, heat_transfer_in_a_rod.java, will appear in a text editor (here, Notepad++):
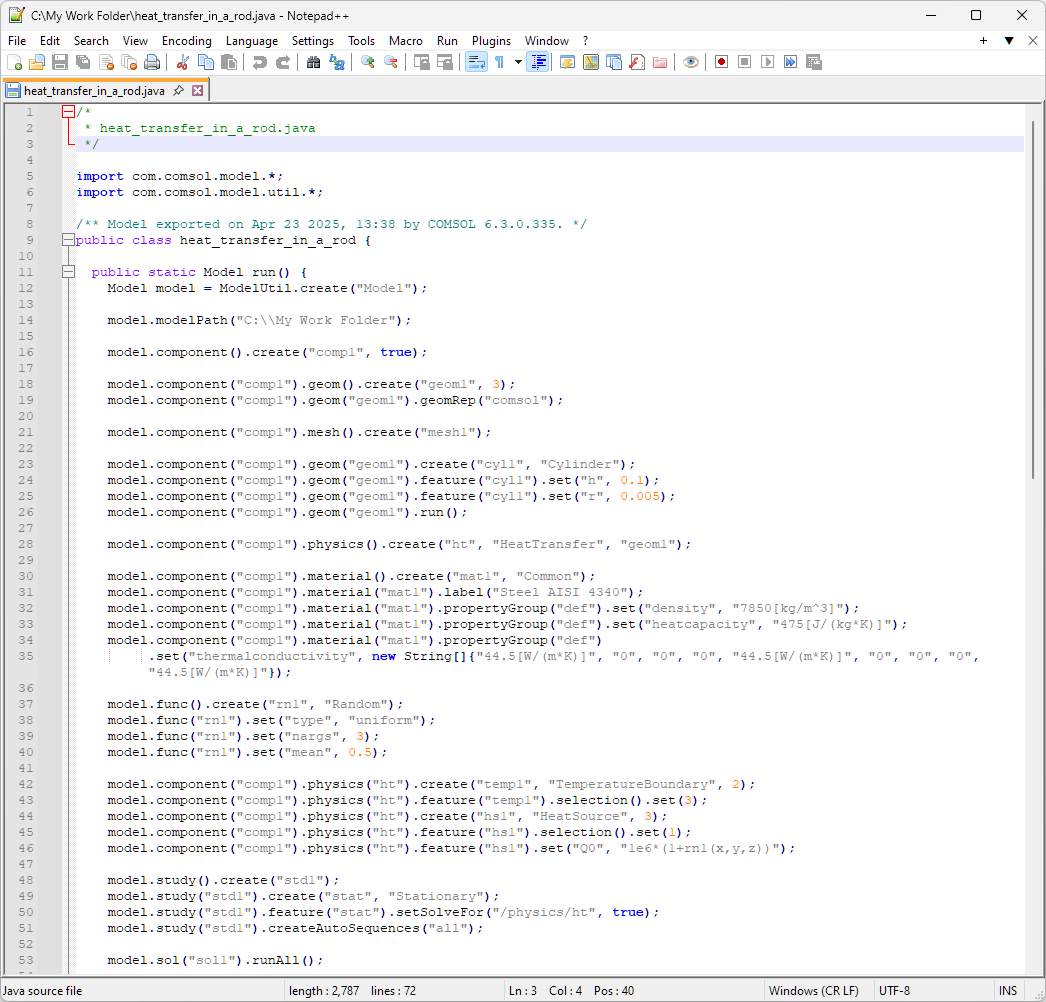 The API code for a steel rod is shown in a text editor that can recognize Java code.
The API code for the steel rod heat transfer simulation as it appears after using the Model File for Java save option.
The API code for a steel rod is shown in a text editor that can recognize Java code.
The API code for the steel rod heat transfer simulation as it appears after using the Model File for Java save option.
Here, we notice a structural difference from the code shown earlier in the Method Editor: This code snippet includes a Java class header:
/*
 * heat_transfer_in_a_rod.java
 */
import com.comsol.model.*;
import com.comsol.model.util.*;
/** Model exported on Apr 23 2025, 13:38 by COMSOL 6.3.0.335. */
public class heat_transfer_in_a_rod {
  public static Model run() {
// The rest of the code</code>
Note: The Java class header is also available in the Method Editor. However, there it is hidden by default. You can enable it from the Preferences window. The Java class header can be useful if, for example you would like to import one of the many Java libraries.
You can now modify this code in any way you wish using standard Java syntax. You can copy pieces of this code into your model or app. Alternatively, you can compile and run the code, as described in the next section.
Note: Saving as a Model File for Java (.java) records every action taken during the session, including missteps and redundant operations. To clean up the generated code, choose File > Compact History before you save.
Compiling a Java Source File
By using the comsolcompile command, you can compile a Java source file (.java) to a Java class (bytecode) file (.class). For a typical Windows® installation, you will enter the following, from the Windows® Command Prompt window (assuming we are using "C:\My Work Folder"):
"C:\Program Files\COMSOL\COMSOL63\Multiphysics\bin\win64\comsolcompile" "C:\My Work Folder\heat_transfer_in_a_rod.java"
The result is a Java class file, heat_transfer_in_a_rod.class, as demonstrated in the screenshot below.
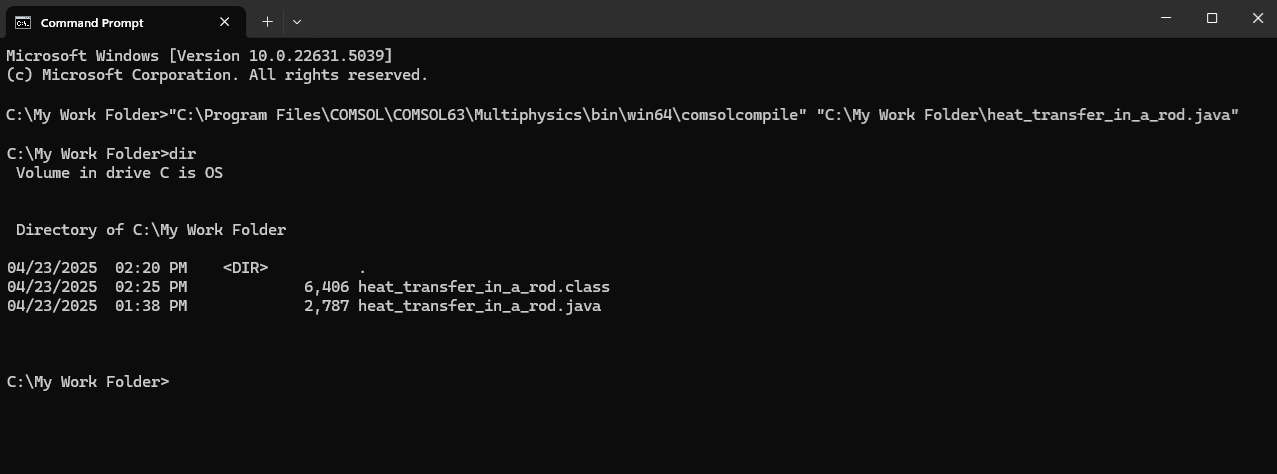 The command to compile a Java file in a specified directory is shown in Command Prompt window.
Using the Command Prompt window to compile a Java source file to a Java class file.
The command to compile a Java file in a specified directory is shown in Command Prompt window.
Using the Command Prompt window to compile a Java source file to a Java class file.
You can now open and run this Java class file in the COMSOL Desktop® by selecting Open from the File menu and browsing to the file. This is similar to opening an MPH file; however, in the case of a Java class file, the Java program (which can include your modifications) is run.
Alternatively, you can run it from the Windows® Command Prompt window using:
"C:\Program Files\COMSOL\COMSOL63\Multiphysics\bin\win64\comsolbatch" -inputfile "C:\My Work Folder\heat_transfer_in_a_rod.class"
This syntax is similar to that used to run an MPH file from the command line:
"C:\Program Files\COMSOL\COMSOL63\Multiphysics\bin\win64\comsolbatch" -inputfile "C:\My Work Folder\heat_transfer_in_a_rod.mph"
Note that running Java class files is different from running code that has been embedded in a model or app. Also, this way of compiling Java class code should not be confused with compiling apps using COMSOL Compiler™. See the "Basics of Building and Compiling Simulation Apps" article for information on compiling COMSOL apps.
Calling External Functions from the User Interface
From the COMSOL Desktop® you can add external C functions under Global Definitions > Functions > External. These functions are supplied as shared libraries, so you can call native C code (or Fortran, C++, etc. code), via a thin C wrapper, just like any built-in or user-defined COMSOL function. In addition, you can add external C libraries using the Application Builder. This makes it possible to embed compiled C code in apps.
Further Learning: Using Java Files and External Functions
For more details on using Java source and class files, as well as external functions, see the Programming Reference Manual. This functionality is available on all of the Windows®, Linux®, and macOS operating systems.
Summary of Functionality in Windows®, Linux®, and macOS
In the Windows®, Linux®, and macOS operating systems, the following table shows the available functionality:
| Functionality | Windows® | Linux® | macOS |
|---|---|---|---|
| Save Java source files (.java) from COMSOL Desktop® | ✔ | ✔ | ✔ |
| Open and run Java class files (.class) in COMSOL Desktop® | ✔ | ✔ | ✔ |
Open and run .mph model files in COMSOL Desktop® |
✔ | ✔ | ✔ |
| Run Java class files (.class) from the OS command line | ✔ | ✔ | ✔ |
Run .mph model files from the OS command line |
✔ | ✔ | ✔ |
| Compile apps with COMSOL Compiler™ from the command line | ✔ | ✔ | ✔ |
| Compile apps with COMSOL Compiler™ from COMSOL Desktop® | ✔ | - | - |
| Run compiled apps and models (including embedded code) | ✔ | ✔ | ✔ |
| Run methods from the Model Builder or Application Builder | ✔ | - | - |
| Run add-ins from the Model Builder | ✔ | ✔ | ✔ |
| Build apps with the Application Builder | ✔ | - | - |
| Write/record code in the Method Editor (Application Builder) | ✔ | - | - |
| Run code in the Java Shell window | ✔ | - | - |
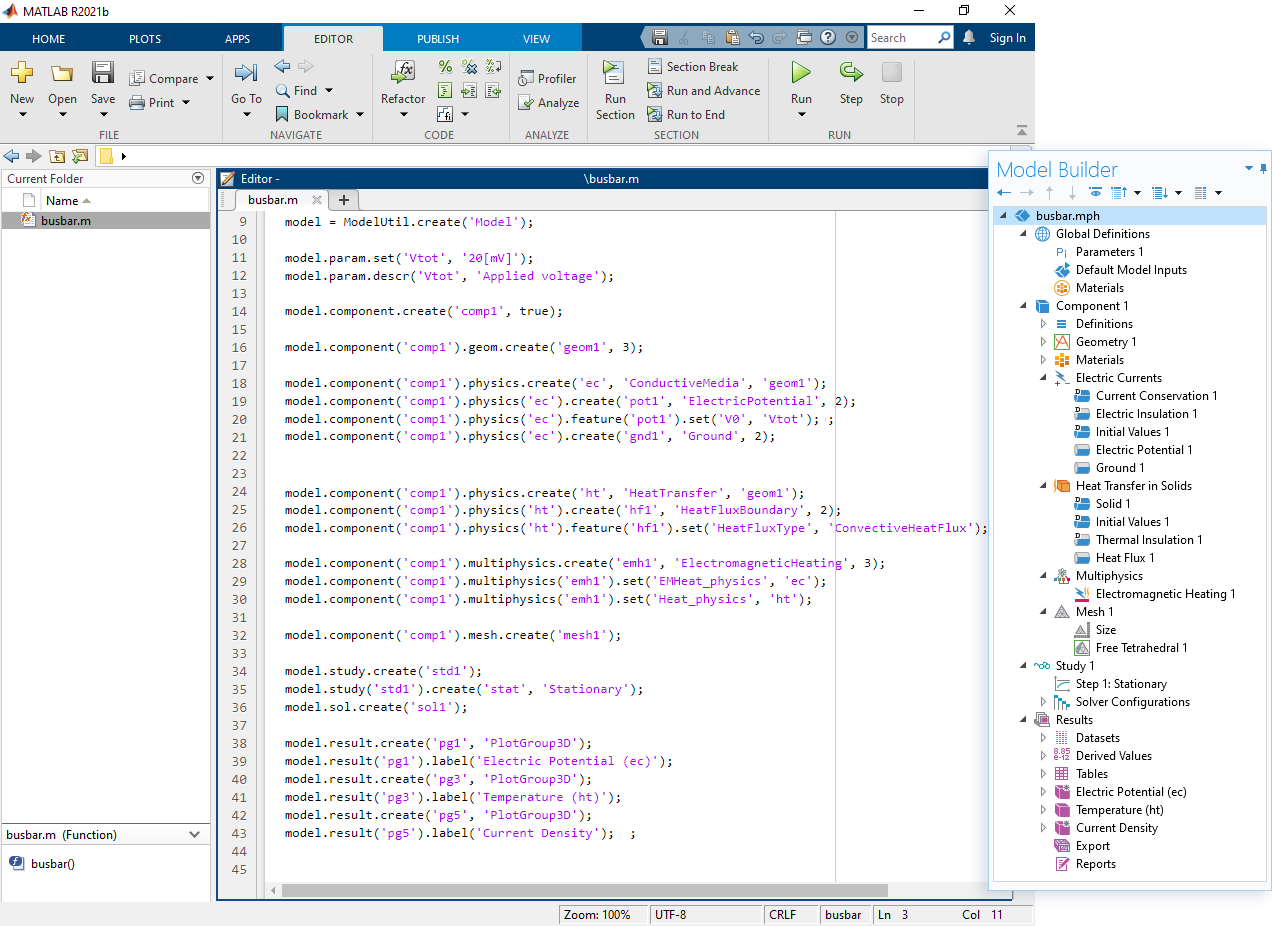
LiveLink™ for MATLAB®
LiveLink™ for MATLAB® lets you drive COMSOL Multiphysics® directly from MATLAB® scripts. MATLAB® commands call the COMSOL API behind the scenes, launching studies, updating parameters, or exporting results. The interface relies on the same COMSOL API for use with Java, so the function names and tree-style syntax will look familiar if you have seen the Java version.
Because the API is fully embedded in the MATLAB® environment, you can programmatically control every stage of a COMSOL model — including geometry, meshing, physics setup, solving, and visualizing and evaluating results. In addition, you can call MATLAB® functions, defined under Global Definitions, from the Model Builder. This functionality is available in the Model Builder under Global Definitions > Functions > MATLAB. See LiveLink™ for MATLAB® for more information.
 MATLAB is open with transcribed information from COMSOL Multiphysics imported.
COMSOL Multiphysics® models can be saved as .m files, which contain all of the information in the model transcribed into MATLAB® code. Import the .m file into MATLAB® to edit the code (and file) directly.
MATLAB is open with transcribed information from COMSOL Multiphysics imported.
COMSOL Multiphysics® models can be saved as .m files, which contain all of the information in the model transcribed into MATLAB® code. Import the .m file into MATLAB® to edit the code (and file) directly.
LiveLink™ for Excel®
For advanced Excel® users, LiveLink™ for Excel® enables you to drive COMSOL Multiphysics® directly from Visual Basic for Applications (VBA) macros. When a command is missing from the COMSOL Multiphysics tab, or when you need to automate a multistep workflow, you can use Excel’s built-in VBA language to call the COMSOL API. Installing LiveLink™ for Excel® exposes the full API to VBA, letting you adjust model settings, run solvers, and handle results without leaving the spreadsheet environment. See LiveLink™ for Excel® for more information.
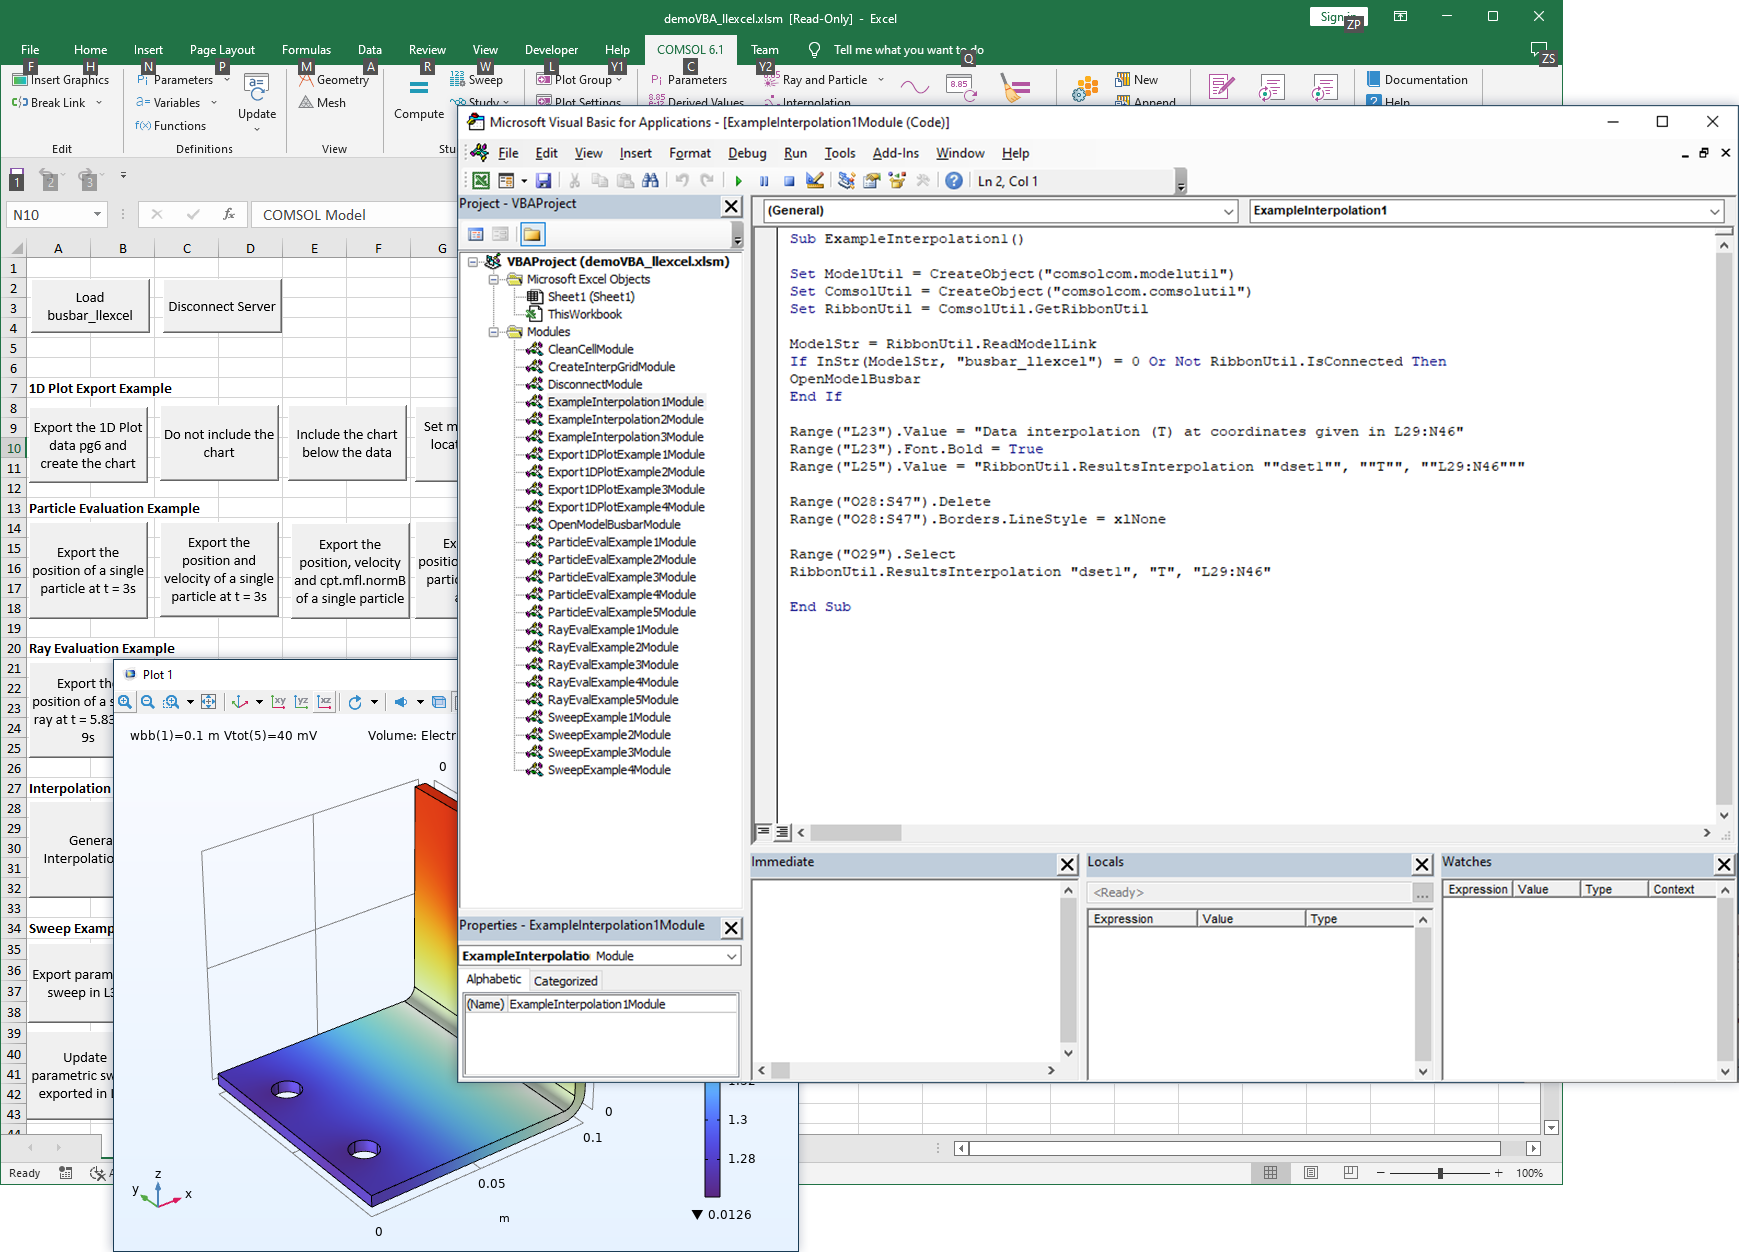 Excel with multiple buttons to run subroutines, the VBA editor window open, and a graphics window showing the model from COMSOL Multiphysics.
When a model is being run and solved via the Excel® interface, a window opens to show the geometry, mesh, and results of the model, along with the progress of the solving process.
Excel with multiple buttons to run subroutines, the VBA editor window open, and a graphics window showing the model from COMSOL Multiphysics.
When a model is being run and solved via the Excel® interface, a window opens to show the geometry, mesh, and results of the model, along with the progress of the solving process.
Summary of API Use Cases
The following table provides an overview of the most important use cases for different aspects of the COMSOL API.
| Typical Use Case | Software Component | Create Models and Write Code | Run Models and Code |
|---|---|---|---|
| Automating modeling steps in the Model Builder and adding custom actions to an app | Method Editor | COMSOL Multiphysics® | COMSOL Multiphysics®, COMSOL Server™ and compiled apps |
| Prototyping code with instant updates to a model | Java Shell window | COMSOL Multiphysics® | COMSOL Multiphysics® |
| Programmatically represented models; server, cluster, or cloud batch runs; integration into a web backend | Java class files | COMSOL Multiphysics® | COMSOL Multiphysics® and COMSOL Server™ |
| Server, cluster, or cloud batch runs | Command-line-driven MPH files | COMSOL Multiphysics® | COMSOL Multiphysics® |
| Interactive command-line results analysis and visualization, custom optimization, and geometry and solution manipulation; running MATLAB® code from the COMSOL Desktop® environment | LiveLink™ for MATLAB® | COMSOL Multiphysics® | COMSOL Multiphysics®and COMSOL Server™ |
| Spreadsheet-driven parameter sweeps or reporting | LiveLink™ for Excel® or VBA | COMSOL Multiphysics® | COMSOL Multiphysics® and COMSOL Server™ |
| Run custom compiled C code | External functions or libraries in the Model Builder or Application Builder | COMSOL Multiphysics® | COMSOL Multiphysics®, COMSOL Server™ and compiled apps |
Submit feedback about this page or contact support here.